|
myOtaku.com
• Join Today!
My Pages
• Home
• Portfolio
• Guestbook
• Quiz Results
Contact Me
E-mail
• Click Here
Website
• Click Here
Personal
Achievements
• Zilch. :B
Anime Fan Since
• Whenever Teknoman was on American television; my first anime ever. -whimpers about Slade-
Goals
• To receive the most flames for a single picture EVER. *accomplishish'd... then the mods removed it*
|
|
|
Welcome to my site archives. 10 posts are listed per page.
Pages (3): [ First ][ Previous ] 1 2 3 [ Next ] [ Last ]
Saturday, June 30, 2007
 :B :B
Comments (7) |
Permalink
Wednesday, June 6, 2007
Henshin yo! (Continued)
Ah hah, yeah. Just adding a list of all of the little henshin-ma-bobs I've done so far (or all of the ones I've done in Paint so far).
 Mew Kazusa (c) Kazusa Mew Kazusa (c) Kazusa
 Mew Aqua (c) MewRubyRedFox Mew Aqua (c) MewRubyRedFox
 MewLicorice (old) (c) Panda Pants/RC MewLicorice (old) (c) Panda Pants/RC
 Mew Cherry (c) Kokkoii-Matoku Mew Cherry (c) Kokkoii-Matoku
 Mew Cherri (c) Cherryshock Mew Cherri (c) Cherryshock
 Mew Licorice (c) Panda Pants/RC Mew Licorice (c) Panda Pants/RC
 Mew Pinklemon (c) Kazusa Mew Pinklemon (c) Kazusa
Huh... I thought I had more...? Guess it just felt like I made more. Oh well.
How do I make those? Click here!
Comments (6) |
Permalink
Monday, May 7, 2007
Henshin, yo!
Ah hah... yeah. Apparently henshin icons are all the rage now. Haven't a clue why... >>;
Anyway, after receiving questions and comments regarding the creation of such icons, I've decided to attempt a little tutorial-ma-bob for the masses, if only to keep my PM box from having a hernia.
So, first thing's first. Most Windows-operated computers come with the basic Microsoft Paint (MSPaint, known simply as Paint for the duration of this post), and due to a complication with my usual advanced program, that is what I use for most of the process.
The program that I use to put everything together is Jasc Animation Shop 3, which can be downloaded for free:
http://www.softpedia.com/progDownload/Animation-Shop-Download-2929.html
The sprite bases I use were ripped from the game Sailor Moon: Another Story. The guy who ripped them is known as Chronomorphosis, or Kris, and his site can be found here:
http://www.chronomorphosis.com/azha/
For simplicity's sake, I've already assembled a sheet of sprite bases from his website.

Next, we need to understand the basics of editing a sprite.
Save the image above to your computer as a PNG or BMP file, then open it on Paint.
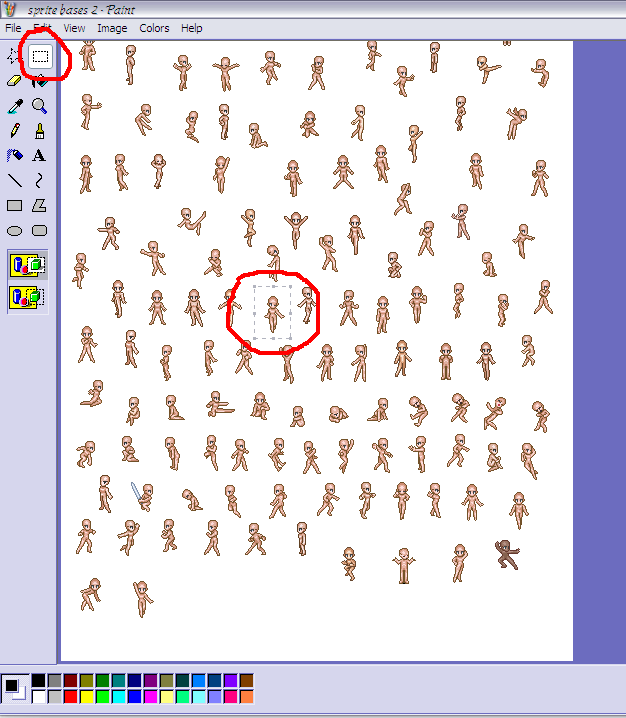
Choose the selection box tool (circled in red) and select the sprite you want (also circled in red).
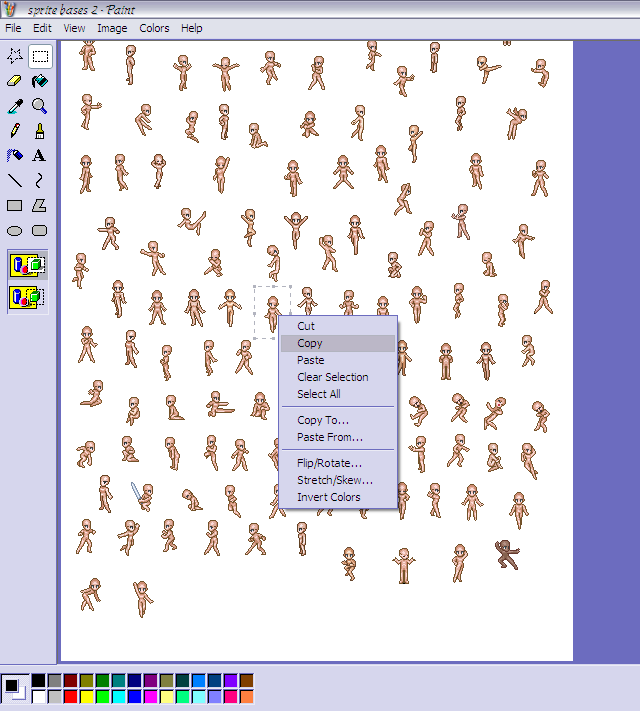
Right-click the box surrounding the sprite you want and select "copy" on the menu that pops up.
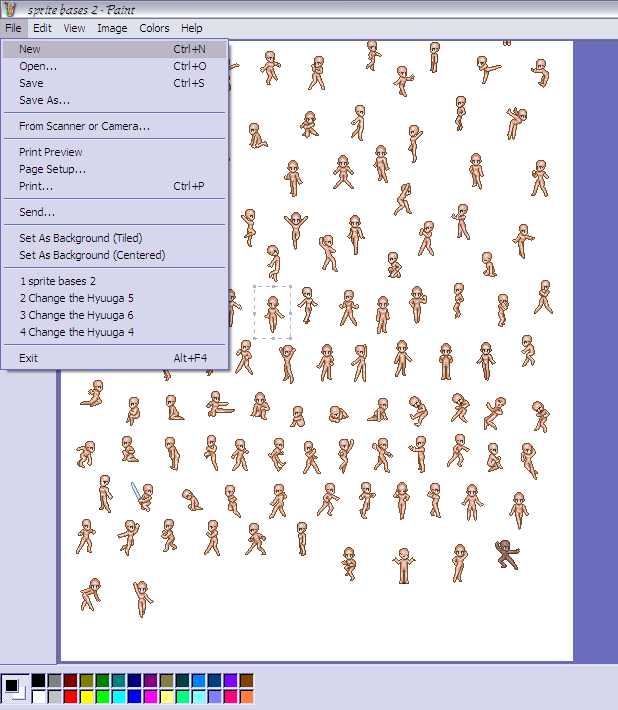
Go up to the main menu and choose "file" then "new".
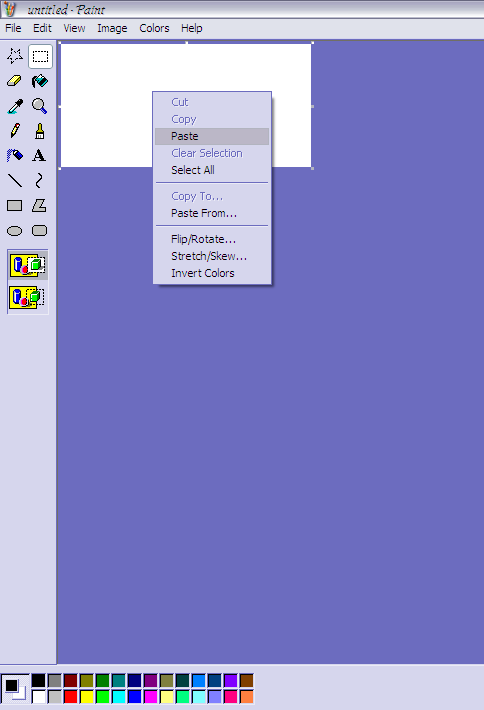
Choose the selection box tool and right click inside your new picture box, then choose the "paste" option from the menu that appears.
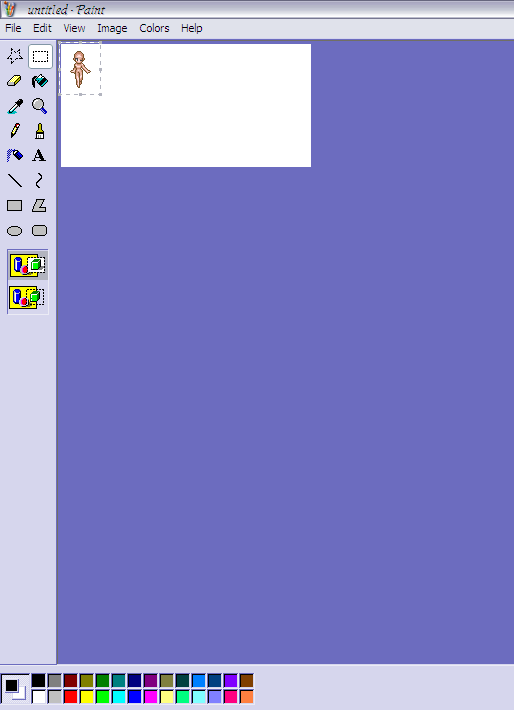
And there's your little sprite base. Click another one of the tools (for instance, the paint bucket tool) to get rid of the selection box outline.
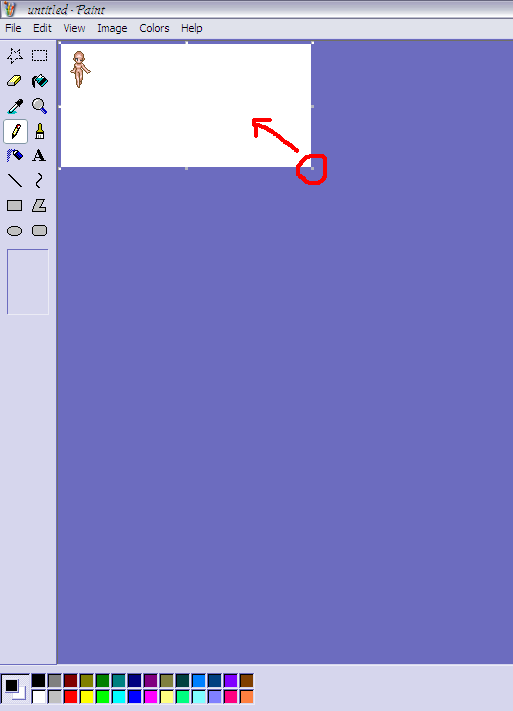
See those little dots along the edges of the picture (one of them is circled in red)? Those are handles that may be used to change the size of the drawing space. Because the sprite is so small, we don't need a very large area to work with it. Just click on the handle on the bottom right corner and drag it toward the sprite to make a smaller drawing area.

... Like that.
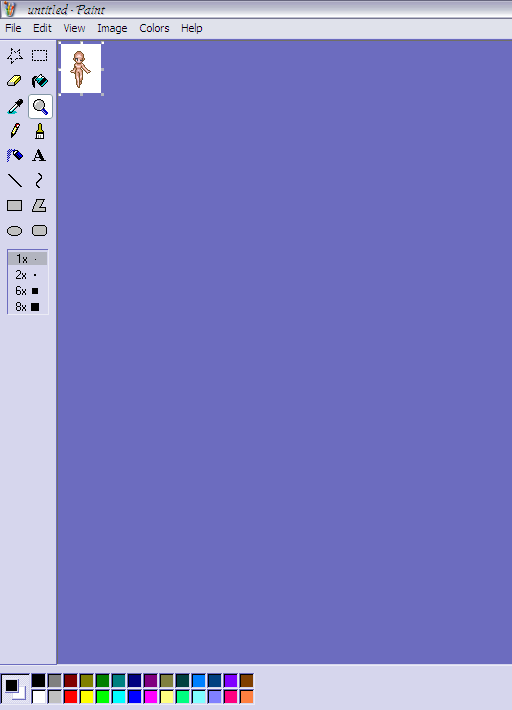
Choose the magnifying glass tool and select the "8x" option from the menu that appears under the toolbar.
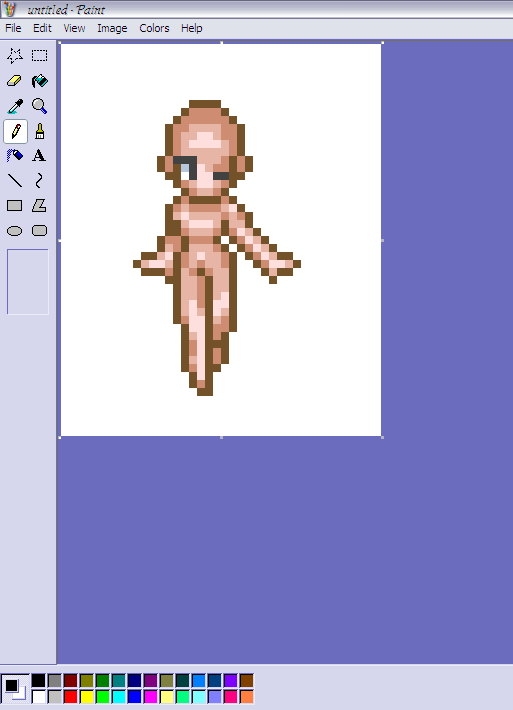
... and there's your sprite close up and ready for editing. :3
Now for something that not a lot of people seem to know about Paint: you aren't limited to the default color pallet. You can choose whatever colors you like to use. How?
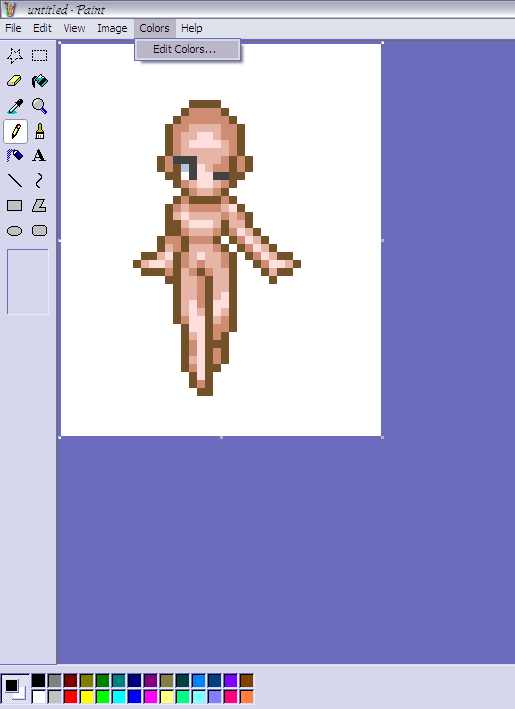
Go to the top menu and hit the "colors" option.
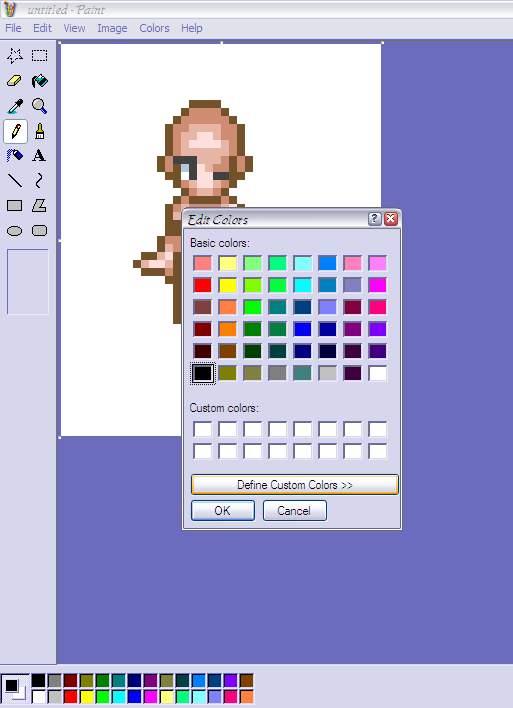
In this new window, hit the button that says "define custom colors".
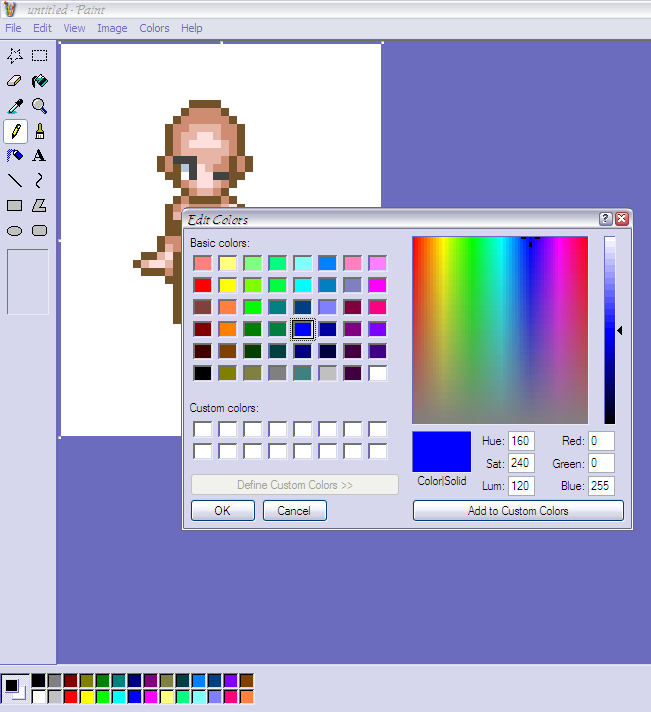
I chose the color blue at random to demonstrate how you can use this color selector to make any color on the spectrum.
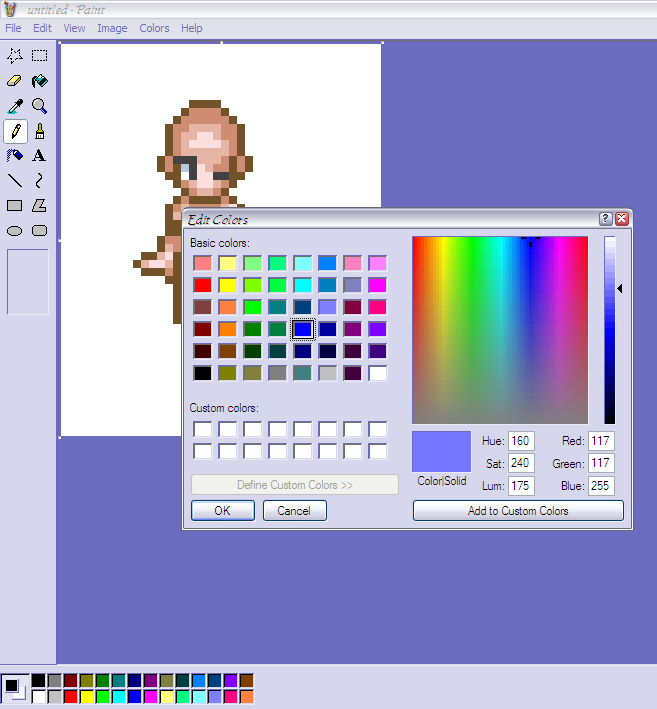
Using the slider to the right, I made my blue color lighter by clicking and dragging the selector up a little. When you have chosen the color you'd like to use, hit "okay".
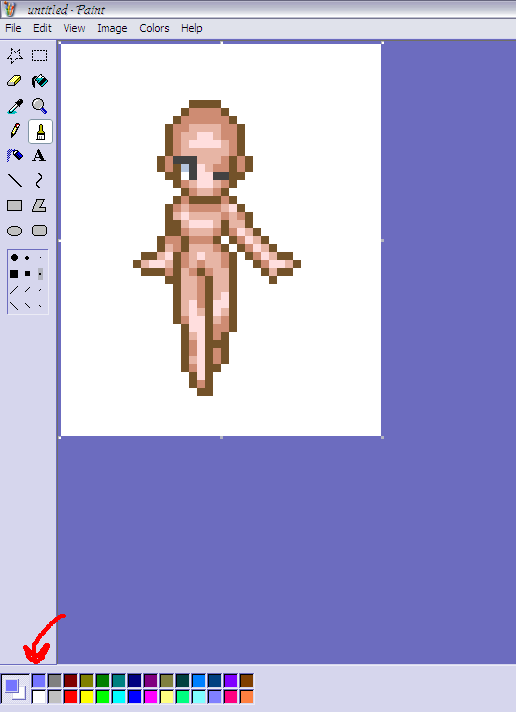
As you can see, the color black on the default pallet has been replaced with the new color. You can replace any of the default color squares by clicking on them, then repeating the steps above to edit the colors.
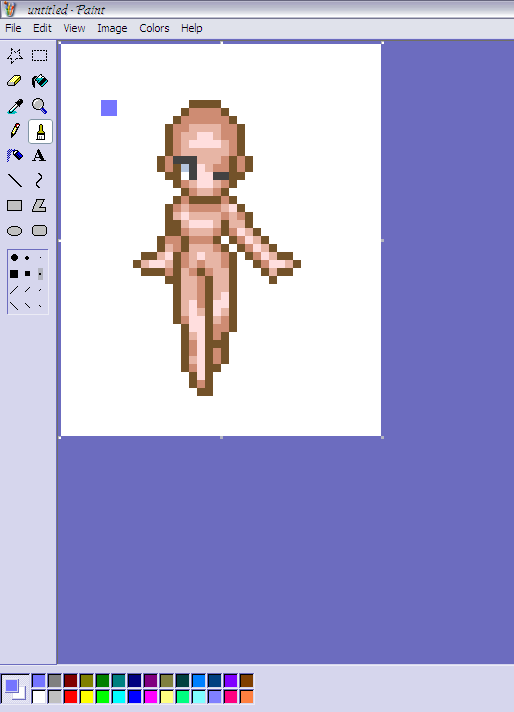
I just made a dot using the paintbrush tool to show how you can start to set up your sprite's color pallet, as shown in the next image.
Editing the sprite itself is actually rather simple. You might have to scoot a little closer to the screen to see my instructions; Photobucket resized my original image. ^^;
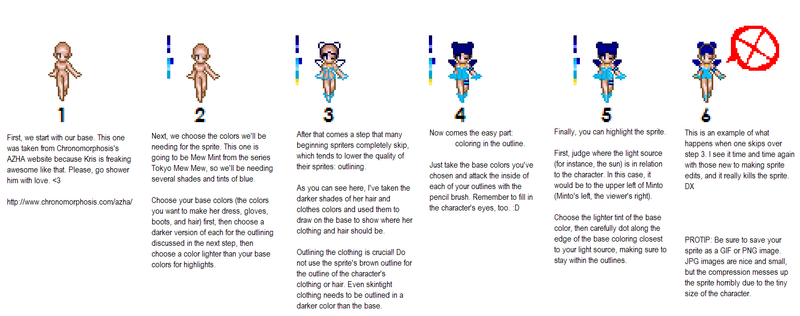
So... now you know how to take a sprite and stick into a new picture to edit it. :D
Okay, knowing the majority of the people on this website, very few of you actually understand how an animation works. An animation is actually a series of pictures that are slightly different from each other flashed by in a rapid sequence so as to provide the illusion of movement. You see my little henshin icon for Mew Licorice up there? That was made up of over one hundred little pictures, from here on out referred to as "frames". :B
The next step is crucial and often skipped by beginning pixel animators because they see it as an "inconvenience": the sprite sheet.
You can make a sprite sheet by the copy-and-paste method described earlier. A finished sheet looks something like this:
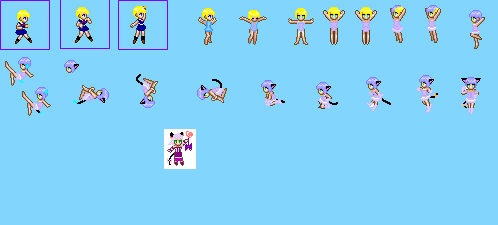
Notice how all of the sprites seem to be sequenced so that their movements flow (relatively) smoothly from one to the next. This is something else to take into consideration when choosing your sprite bases. If there is no "transition" pose between two poses that are not similar, the movement appears abrupt and, in some cases, blocky and amateurish.
NOTE: Remember to save your sprite sheet and all documents relating to the sprite or animation as a PNG or BMP file, not a JPG/JPEG file. JPG files are nice and small, but they compress the image so much that it destroys the sprite's resolution and makes it look really bad.
Now that you have your sprite sheet set up, you can move on to making the frames for the animation.
The frames should all be the same dimensions, as it looks kinda weird when the box around the character keeps moving around, killing off the illusion of movement. I usually set my frames at 50x50 pixels.
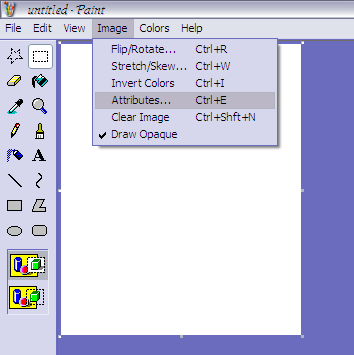
To set the size of your base frame, go to the menu at the top of the screen and choose "image", then "attributes".
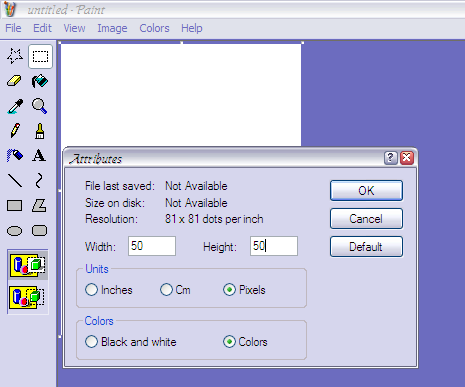
In the window that pops up, change the values in the little white boxes to whatever you want. Again, I typically go with 50x50 pixels.
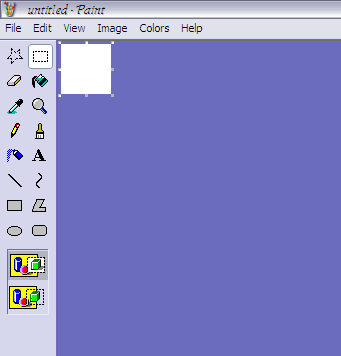
Click "okay" when you're done and your frame will be sized accordingly.
From your sprite sheet, use the copy-and-paste method to make each frame, saving them numerically as you go (i.e. "001", "002", "003", etc.) and making sure that they are either BMP file or PNG files. Try to keep the sprites aligned as you go to avoid the character jerking around randomly when the animation is complete.
Okay, so now you've finished your frames. Great! You're ready for the last step: animation.
I'm going to use the pixel henshin for Kazusa's Mew Kazusa to show you how to use the program you downloaded at the beginning of this tutorial. :3
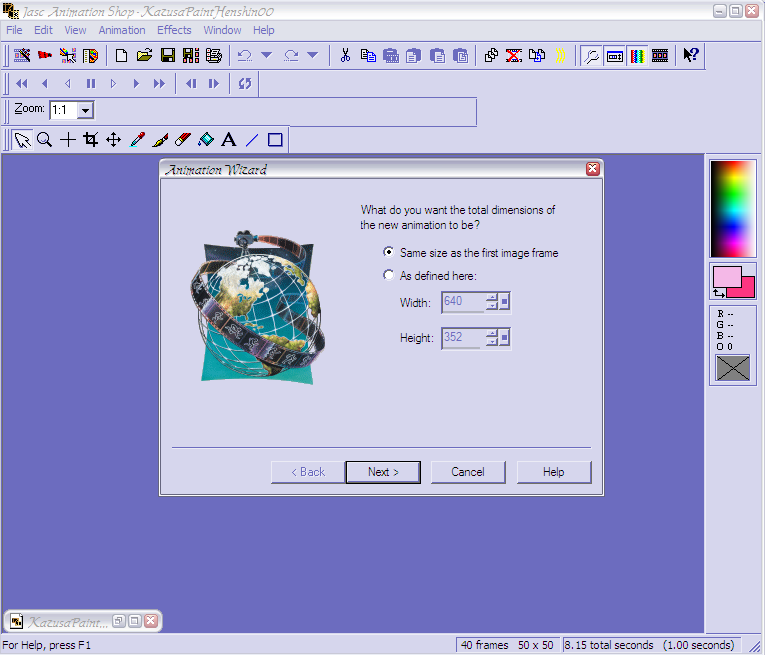
First, open the program and hit the little filmstrip-like icon that is directly under "file" to open up the new animation wizard.
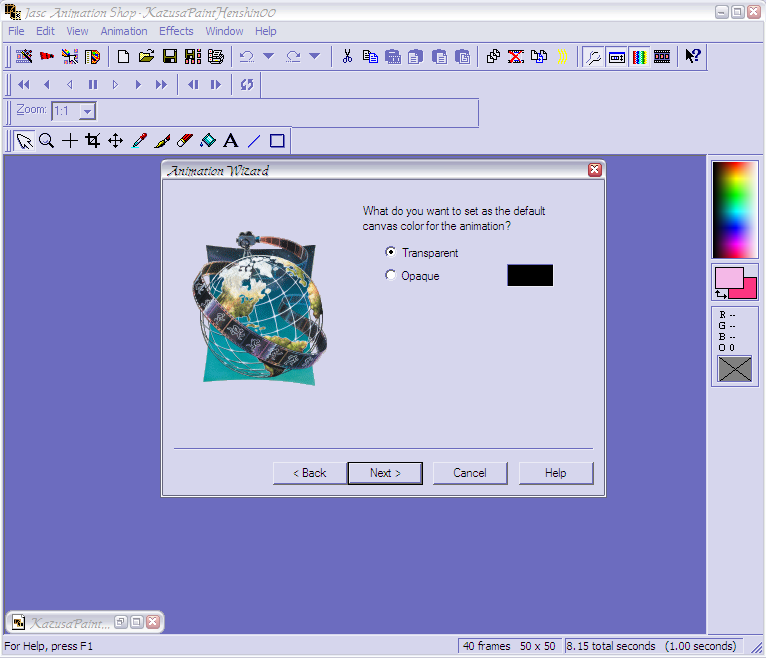
I generally choose "transparent" when dealing with the backgrounds, in case I change my mind about the animation as a whole and want to make it a transparent animated sprite. That is a whole different tutorial all together, though. XD;
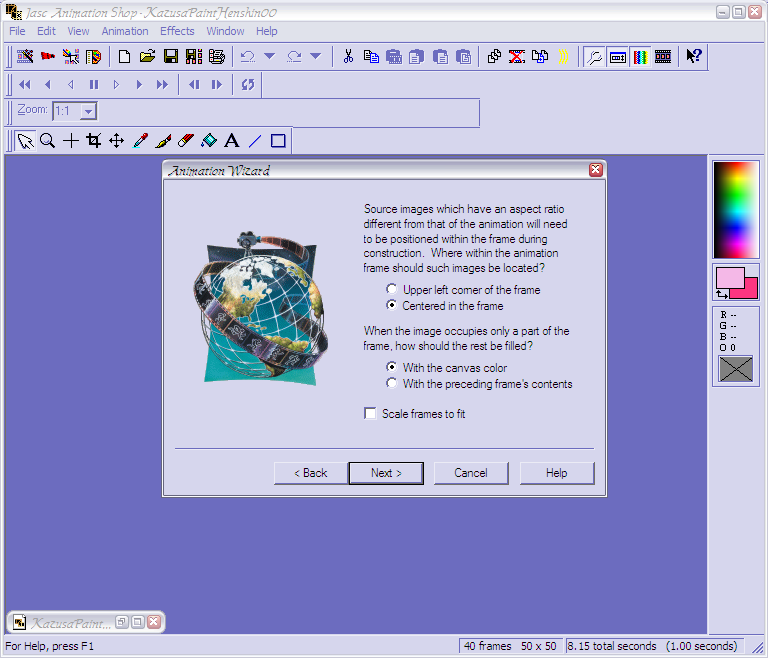
You want the default settings on this one. Don't ask why, just... ah, do it.
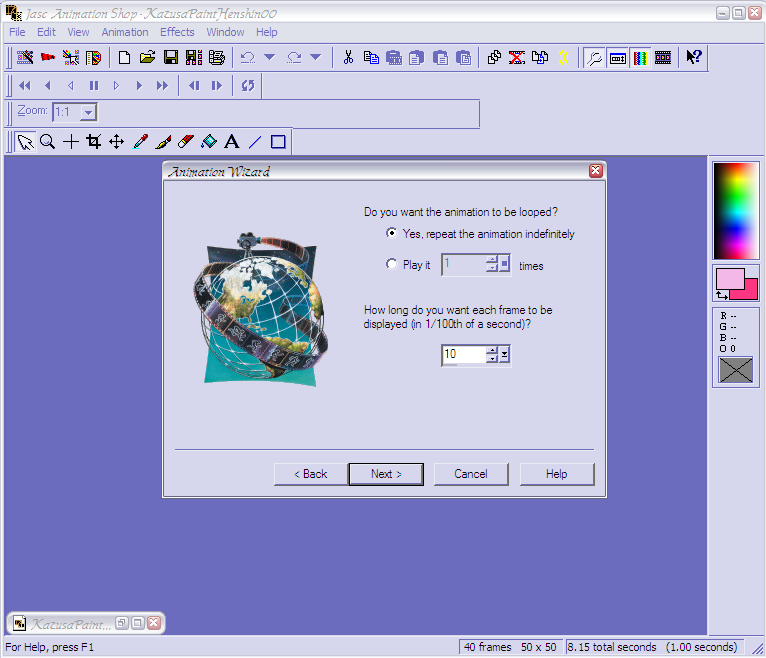
Generally, you want your animation to play continuously, so keep that little box checked off. As a rule of thumb, have all of your frames start off with a duration of ten-hundredths of a second. You can change it later as needed.
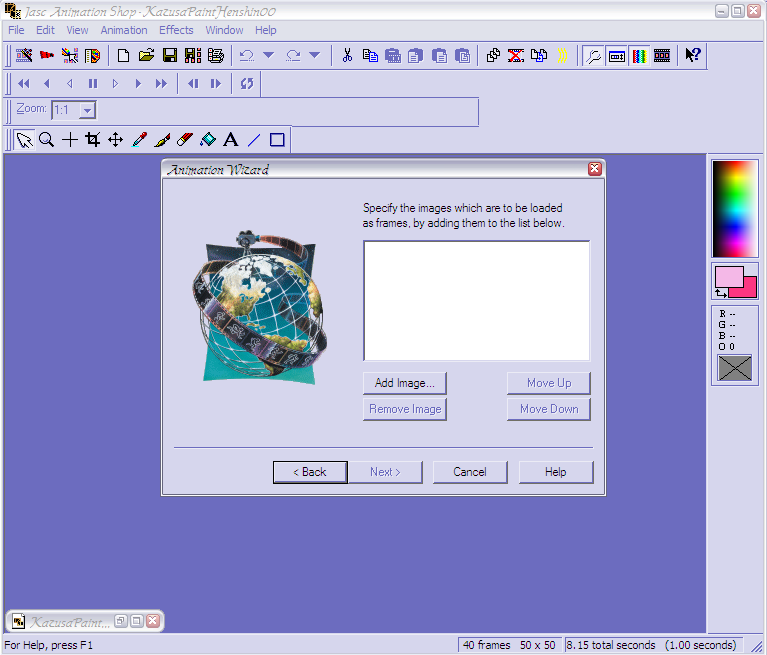
Hit "add image"...
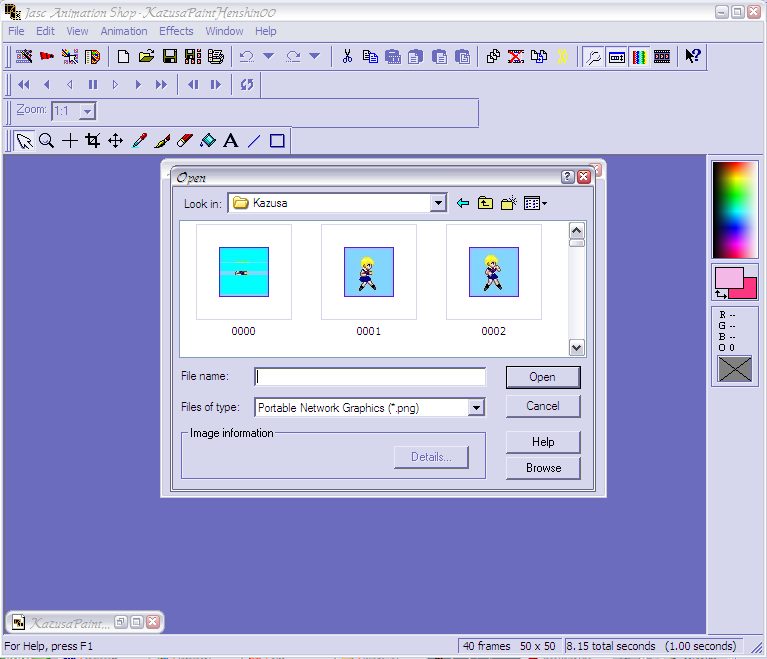
... and go dig up the folder you stored your frames in. Remember how I said to name then numerically? This is why. Click on your first frame ("000.png" in my case)...
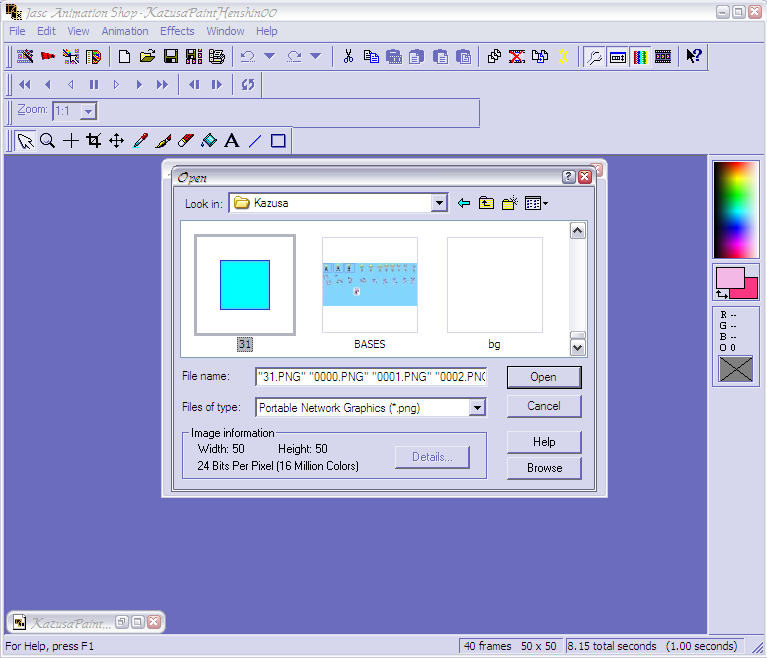
... the hold down the "shift" button on your keyboard, scroll down to the last frame, and click on it. That's how you select a bunch of images at the same time.
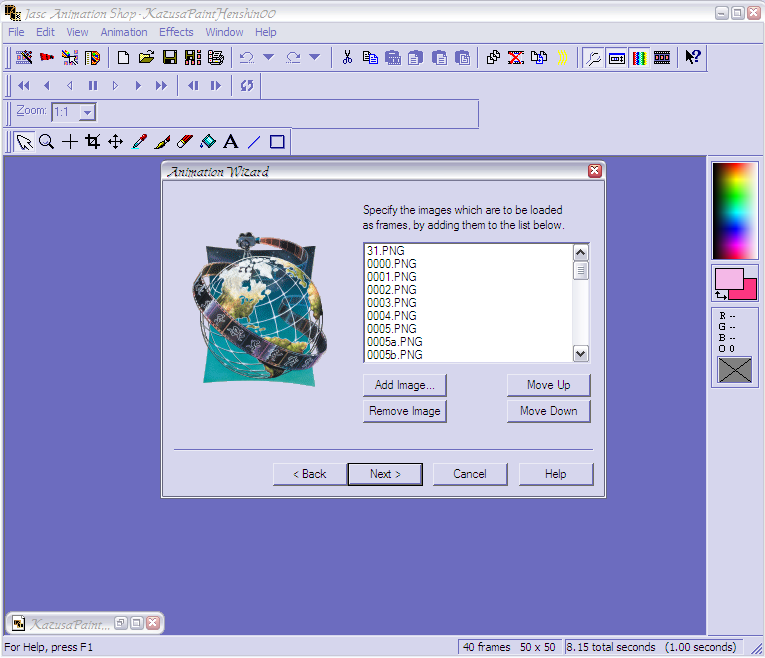
The problem with this selection method is that it takes the last frame and sticks it up before the first frame. You don't want this.
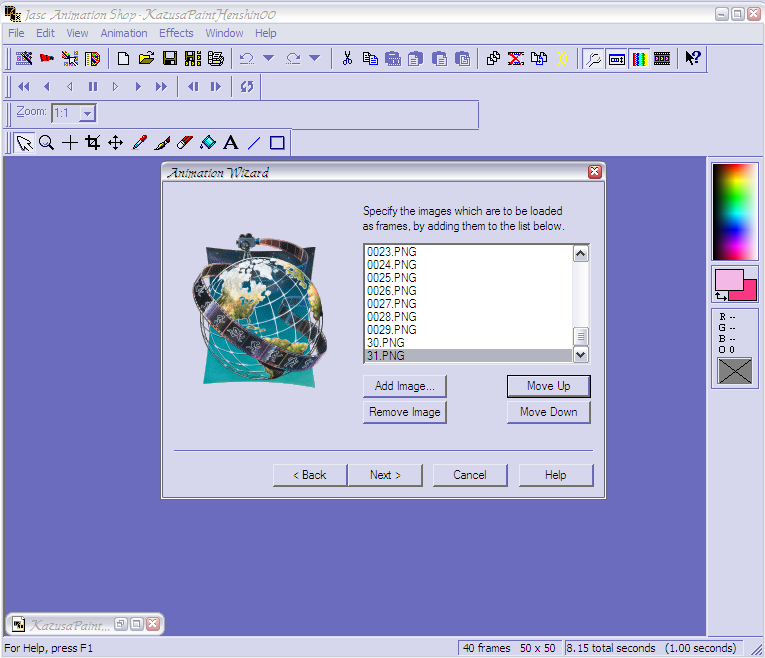
Click on the errant final frame, then hit the "move up" button to move it back into place.
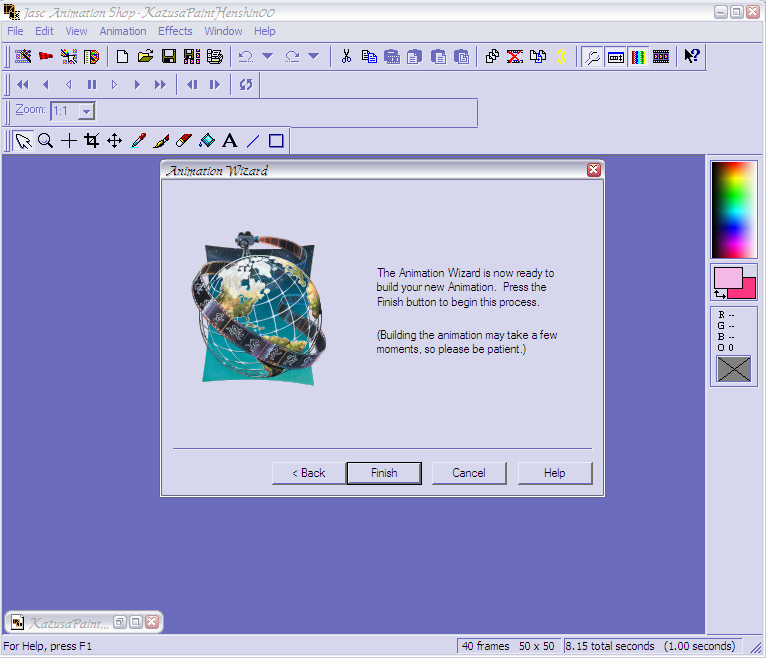
Finished, you say? Nay, for you have only begun~
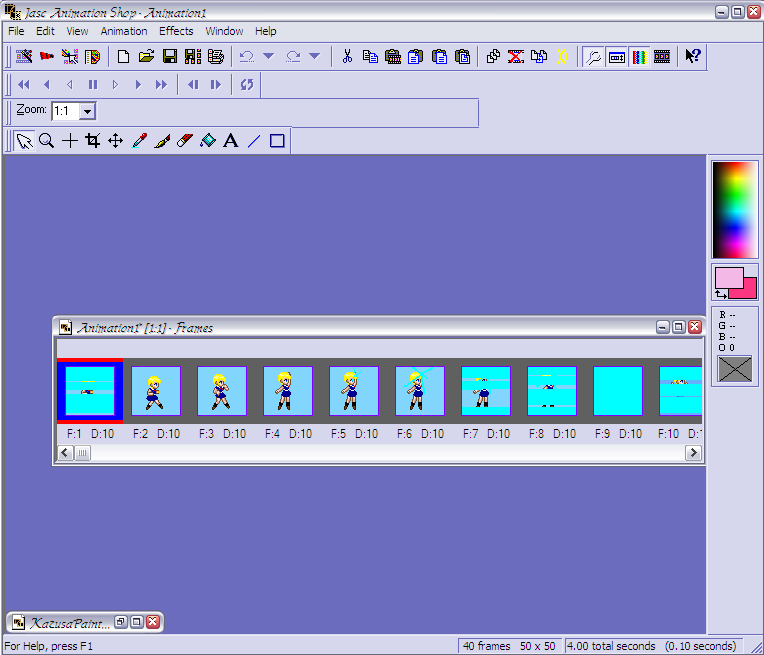
And here are all of your frames lined up and ready for the last few steps in the process.
The real "first" frame of this animation is the second frame in the sequence. For you, it's probably the first frame in the sequence. Regardless, it's far too short how it is now. We need to keep this frame still for a few seconds so the viewer can see your Mew as a human.
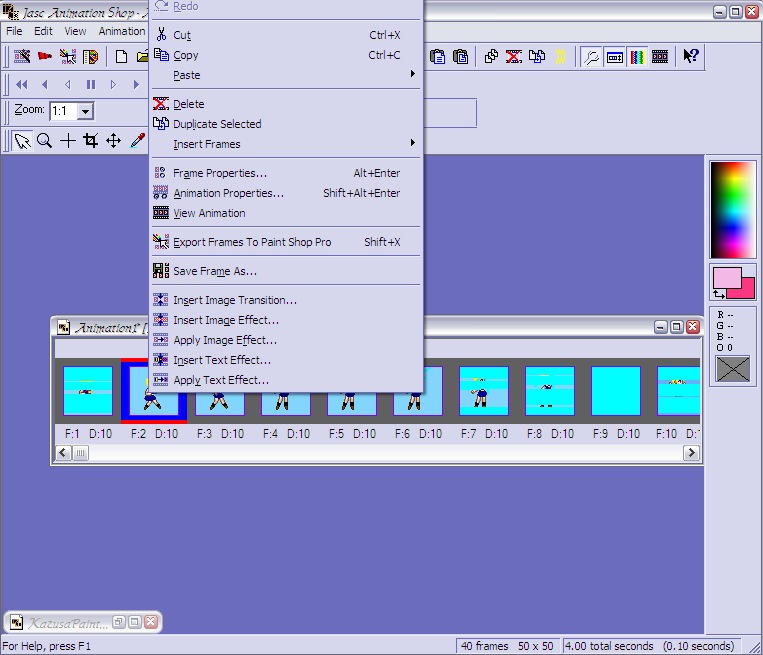
Right click the frame you want to change the timing for...
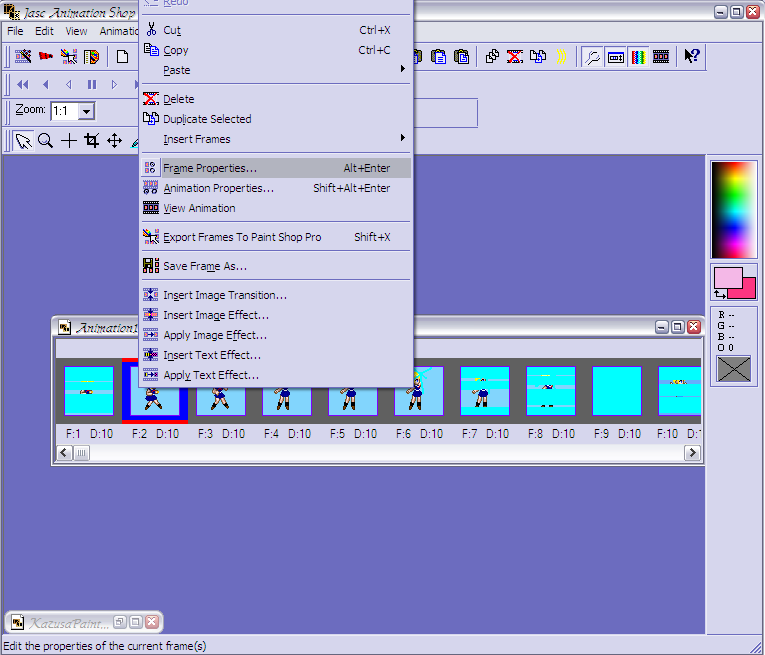
... and choose "frame properties" from the menu that pops up.
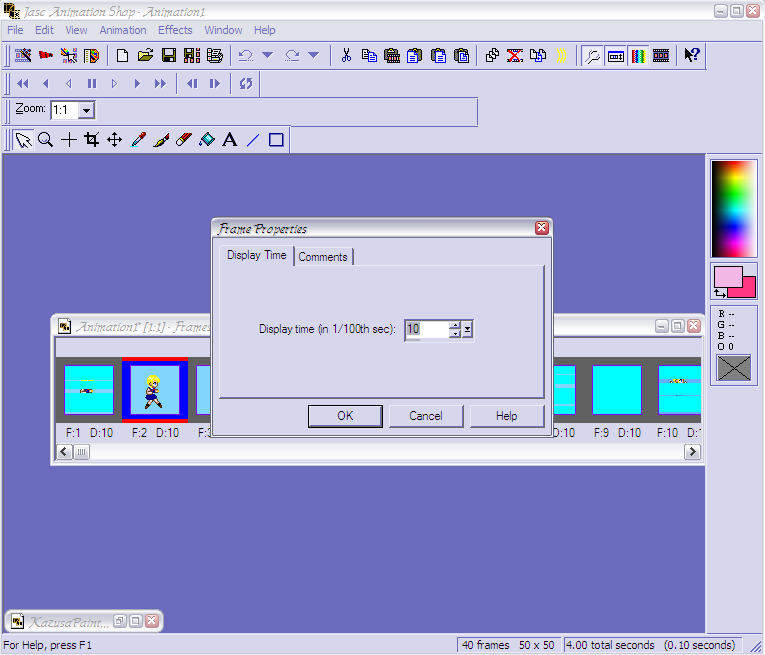
You want this particular frame to be displayed longer than the rest, so change the number in the box from ten...
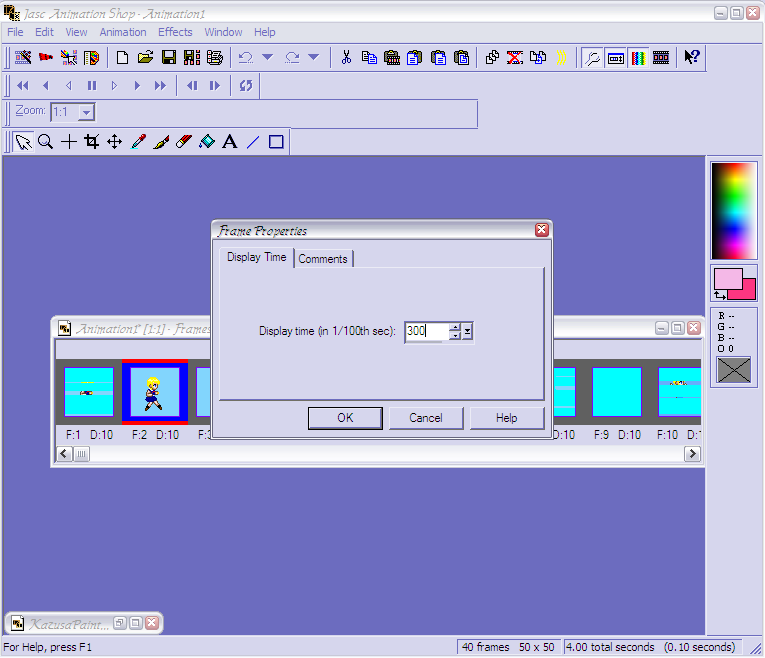
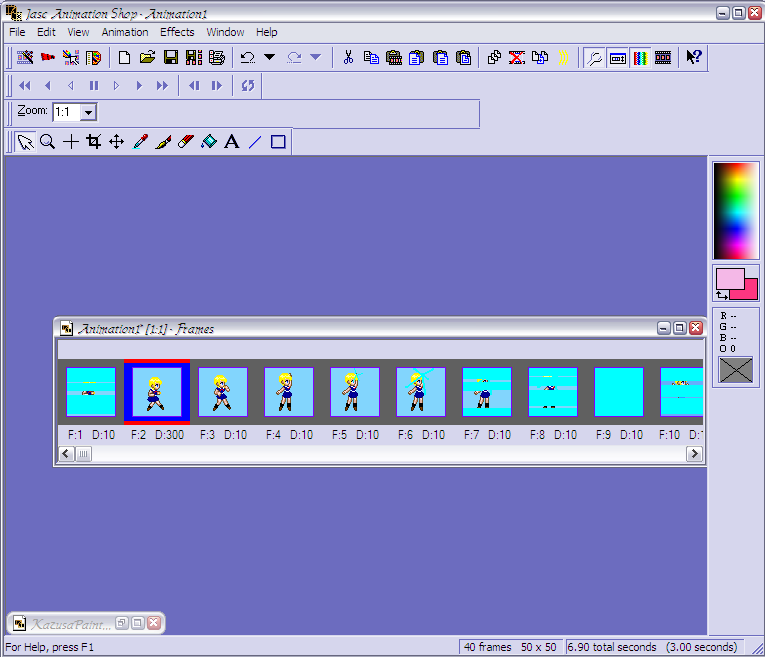
... to three-hundred. That means that the frame will be displayed for three seconds.
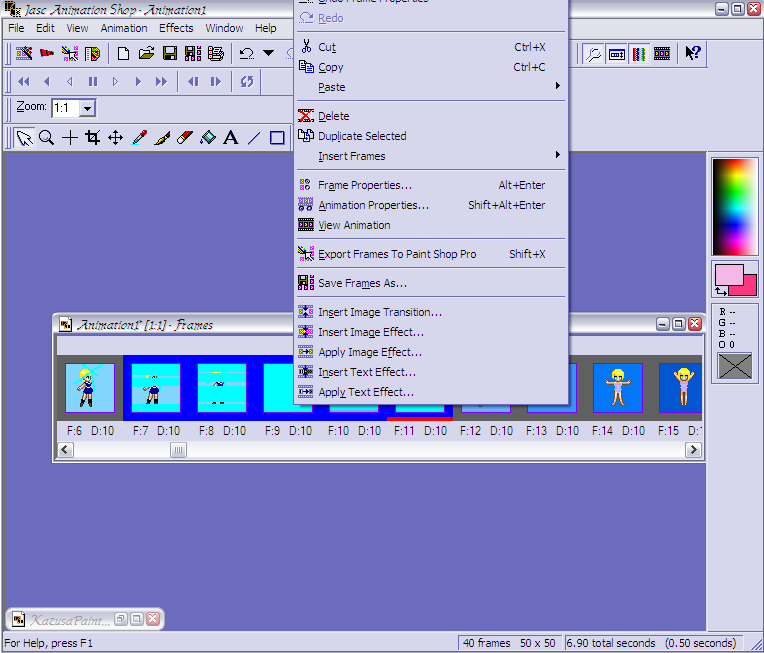
Some bits of the animation, like these little flashes of "energy" need to go by faster than the rest of the frames. I selected them all at once by holding down the "Ctrl" button on the keyboard and clicking on each one of the frames I wanted to select. Holding down the "Ctrl" button while doing this makes it so you don't have to select frames that are right next to each other in the sequence. You could select the first and last frames only if you want to... but we're not going to for this.
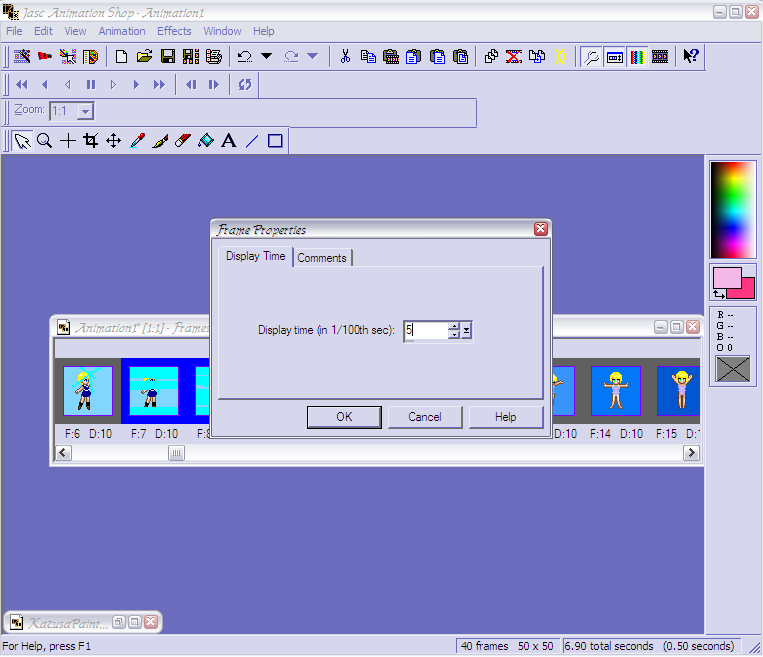
The timing on these frames is changes to five-hundredths of a second. That's very fast!
For the sake of bandwidth munchage, I'm not going to post the rest of the images associated with changing the timing for the rest of the frames, as the steps are all the same.
NOTE: The opening frame showing your character in her human form and the last frame showing your character in her Mew form should be displayed the longest, about three seconds each.
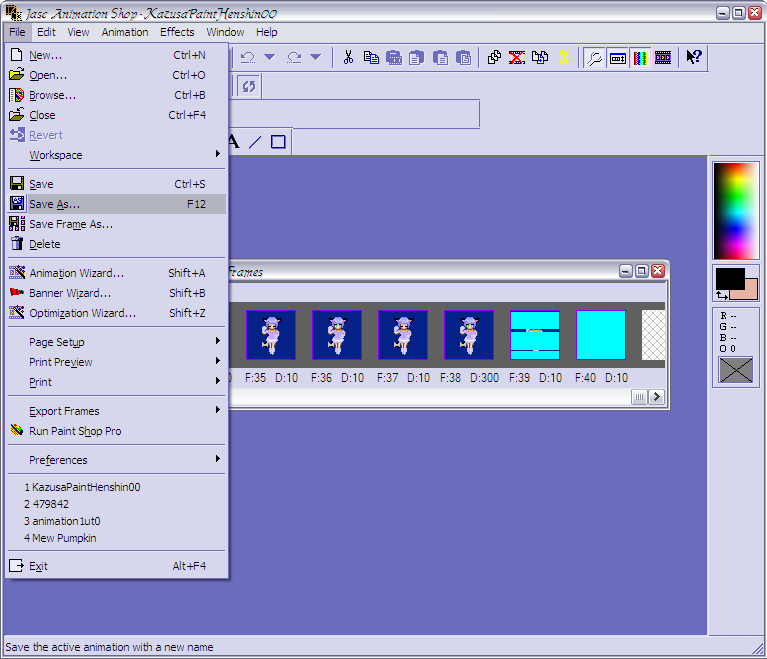
When you're done with your timing edits, save your icon! Hit "file" from the top menu and "save as"...
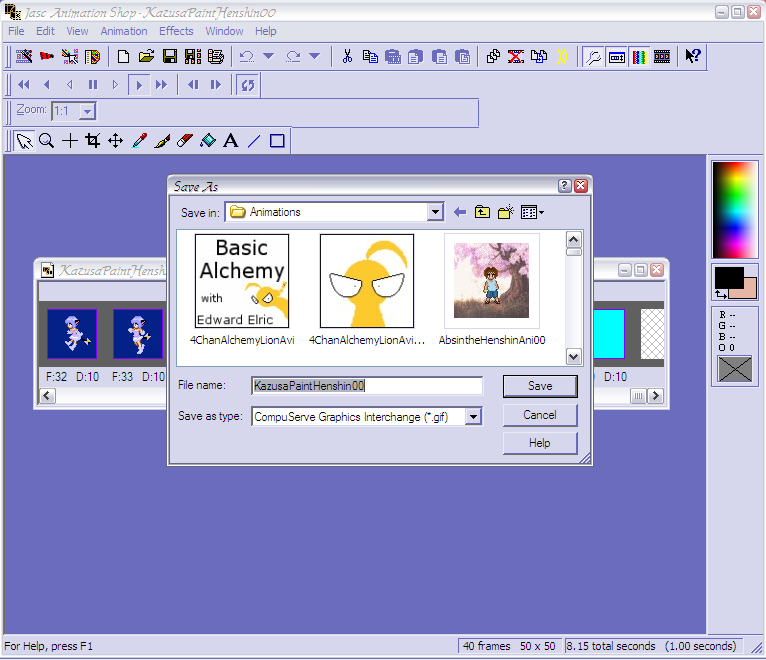
... and name it whatever you like. Be sure that the image is saved as a GIF file, as seen here.
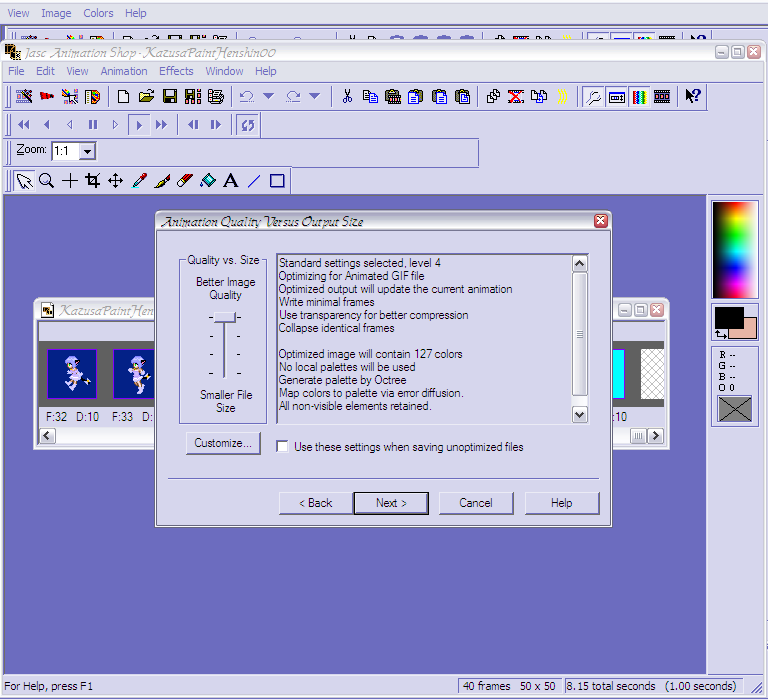
As soon as you go to save, a new window will pop up asking you about how you would like to optimize your GIF file. Make sure the little slide bar is up toward "better quality image", then hit "next".
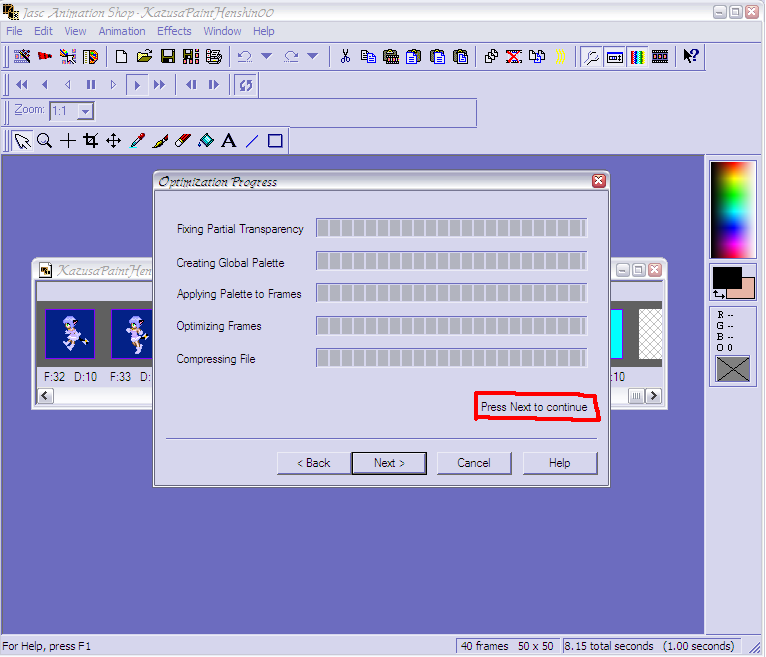
Enough said. :B
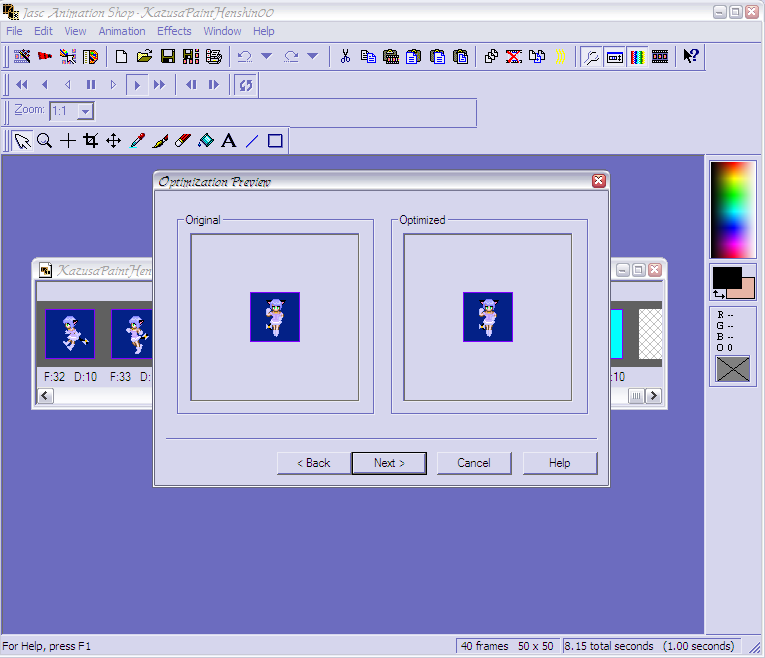
Here it will give you a preview of what the compressed GIF file will look like compared to how the original file looked. If there are no noticeable differences between the two, hit "next"...
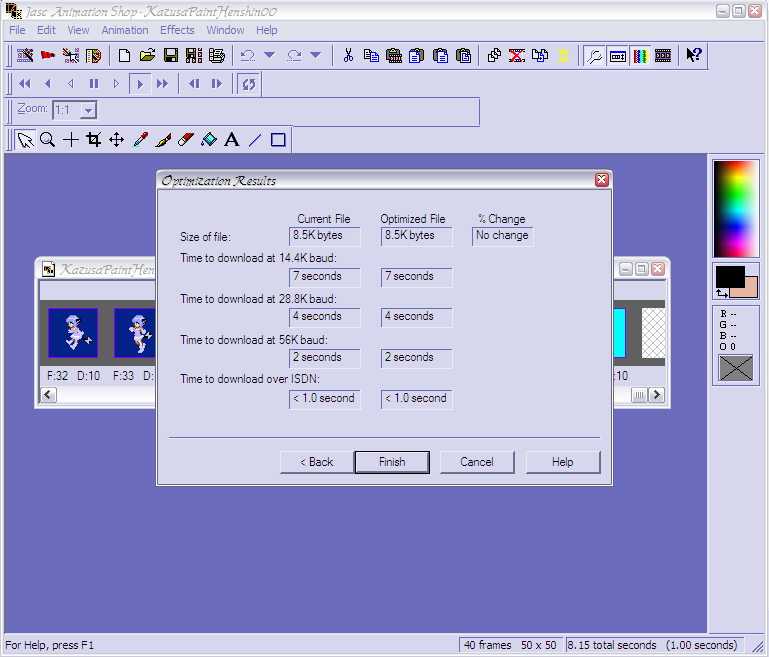
... and you'll be hit with one last window. This one is critical to uploading the icon on myOtaku. See where it says "optimized file"? That should be under 50kb. In the case of Kazusa's henshin, it is well under that number, and so is perfectly fine to upload to myOtaku for your avatar.
Just hit "finish" and you're done!

Egads, that's one freaking huge post. If you have any questions, leave them in the comment box for this entry.
Comments (8) |
Permalink
Thursday, April 12, 2007
So it goes.
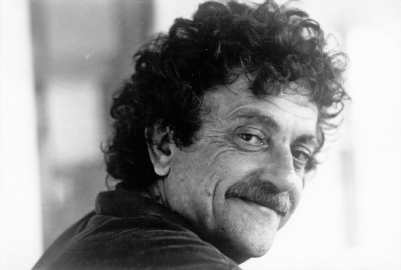
Kurt Vonnegut
(1922-2007)
Goodnight, sweet prince.
Comments (3) |
Permalink
Sunday, April 8, 2007
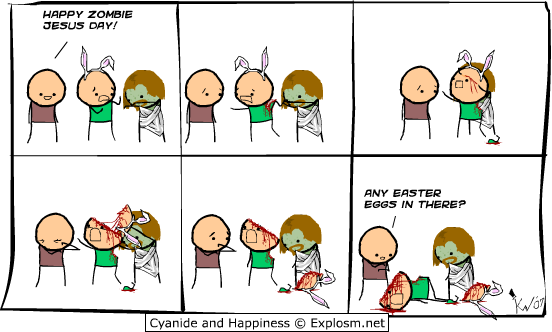
HAPPY ZOMBIE JESUS DAY!
Almost too late, but not quite. Hope those who celebrate had a nice day, yadda yadda.
...
...
BRAAAAAAINS. :B
Comments (3) |
Permalink
Thursday, March 29, 2007
Got this alert from Shrine-Maiden this morning:
"Sailorichigo of tokyopop.. is steal once again!! heres da link:
http://www.tokyopop.com/SailorIchigo/art/
everytime you sighne your art put your name and the (c) sighn and then write your user name and sighned your real name ^^ k? cuz we don't want her stealing anymore :("
Amusingly, even if one were to do that, they'd have to go and ruin the picture by having that information right in the middle of the picture to make sure she doesn't just erase it.
Unless... idea!
What if you were to sign your name somewhere on the picture where it isn't obivious, where only you may be able to find it (possibly in the clothing of a character or something) to prove that the picture is yours when (and if) it is stolen? I don't seem to have to do that, as people don't generally steal from me, but those who have had stuff taken before might want to consider doing this before they destroy one (or several) of their pictures by putting their Copyright information across the middle of it in huge text. .___.;;
Comments (4) |
Permalink
Friday, February 2, 2007
 HTM-hell. D: HTM-hell. D:
... And thus I learn that coding websites is a pain in the ass when you have no idea what you're doing. D:
On that note, I have Mew Licorice's website up and running with a new theme, a new webhost, and a whole new slew of bugs to work out. But... it's there, and I've proven that you don't have to use Freewebs' basic layouts if you don't want to.
Hah hah, yes, I have nothing better to do than waste time yapping about a fan site for a fan character. I'll leave you all be now.
Comments (1) |
Permalink
Wednesday, December 27, 2006
 Crapart Dump Crapart Dump
Yuh-huh. Felt like I needed to move my bitchy rant-fest down a bit, so... RANDOM SPAMMAGE CRAPDOODLE DUMP. :D
[x] Random doodle of my Mew Licorice with her weapon, the Licorice Lyre.
[x] BLASPHEMY! I mean, er... aforementioned character, sharing a kiss with Royal Highness from the Tokyo Mew Mew A La Mode series. Totally noncanon, even in Licorice's storyline, so don't worry about me "stealing your bishounen" or anything... or, if you feel the urge to beat me, anyway, please read the previous entry. :D
[x] Something Kokkoii and I brainstormed. There's a Cherry and a Cherri already, but no Cherii. So... now there is. Meet Akani Cherii. She's a Sumatran rabbit with an Amaloli-ish outfit that is pure hell to draw. Kinda cute, though... colors are dark red and pink (inverse Ichigo). Drawn just this morning (it's about two in the morning right now).
... And now for something COMPLETELY different.
[o] Gaia Online user Aki Kyuubi. Drawn AGES ago, uploaded on whim. Huzzah.
[o] Gaia Online user Caramel Custard, drawn more recently in an attempt to stop drawing magical girls... which failed horribly. D:
... Er... so... yeah. Yay, unfinished crap. :D
Comments (2) |
Permalink
Monday, December 4, 2006
 ¬_¬ ¬_¬
UNCLEEEEAN! UNCLEEEEEEAN! D:
Dude, I can't believe the things I'll do to prove a point. What did I do, you ask? Go take a look at my gallery; more specifically, take at gander at the abomination that is LicoricexRyou. D:
Once again, that picture is meant to be a parody of the situation between Cherryshock and DiceMaster, and should be treated as such. I got sick of their pointless fighting, so up it went. It's stupid that they stopped being friends over a bleeding anime character, though. It's bad enough when friends split up over a real boy; this is just sad. D:
Feel free to rant at me here; I won't report you or anything, as I know I'm being rather provacative at the moment.
So... have at it.
Comments (6) |
Permalink
Wednesday, November 29, 2006
 OH GOD KILL IT WITH FIRE. OH GOD KILL IT WITH FIRE.
... Right. So, I purged about a third of my gallery today 'cause it was Pure and Utter Crap of the Highest Degree. Not that what's left is any better, but... I HAD to rid myself of a few of those horrible THINGS. I'm amazed that people were nice enough to allow me to draw their characters in the first place. D:
So, yeah. Other than that... I'mma workin' on a fansite for my Mew Licorice. Have the domain and layout set up, now I just have to go about actually compiling stuff to put up. @___@;
Comments (0) |
Permalink
Pages (3): [ First ][ Previous ] 1 2 3 [ Next ] [ Last ]
|
|